

Crochet Pinecone Cup Cozy: A Little Woodland Detail for Your Coffee
Two little pinecones, a few green leaves, and a soft sage sleeve turn an everyday coffee cup into something special.
This crochet pinecone cup cozy combines a simple single-crochet sleeve with dimensional decorations made separately and attached at the end. The brown pinecones bring texture, while the trailing sage sprigs give the finished piece a delicate woodland feel.
My finished sample fits both my medium and large cups. Below, you’ll find the materials, written instructions in US crochet terms, and the assembly order for both pinecones.
Watch the Video Tutorial
Follow along with the video to see the stitches, pinecone layers, and finishing details up close:
[Watch the Pinecone Cup Cozy Tutorial → https://youtu.be/wT-tU5ibBDU]
Keep this written pattern nearby while you watch, especially when counting rounds or organizing the pinecone layers.
About This Project
The cup sleeve is worked from the bottom upward, beginning with 44 stitches and gradually increasing to 48. The decorations include two sage sprigs, dark-green leaves, and two pinecones in different sizes.
Each pinecone is assembled from small crochet layers. You’ll make four layer types—A, B, C, and D—then combine them in different sequences.
The sleeve is the simplest part of the project. The smaller decorative pieces require closer attention to stitch placement, so take your time with the first repeat of each layer.
Materials
- Sage-green yarn for the sleeve and trailing sprigs
- Brown yarn for the pinecones
- Dark-green yarn for the leaves
- 2 mm crochet hook, as used for this project
- Yarn needle
- Scissors
- Stitch marker
- Cream yarn or cord and optional fine gold thread for the decorative hanging details
- The cups you would like the finished sleeve to fit
Yarn thickness and crochet tension affect the finished size. Keep your cups nearby and check the fit as you work.
US Crochet Abbreviations
- MR: magic ring
- ch: chain
- sl st: slip stitch
- sc: single crochet
- hdc: half double crochet
- dc: double crochet
- inc: work 2 sc into the same stitch
- st / sts: stitch / stitches
- FO: fasten off
Pattern Notes
Work the sleeve in joined rounds without turning. Begin each round with ch 1 and join with a slip stitch to the first single crochet. The starting chain and joining slip stitch do not count as stitches.
For the pinecone layers, work all stitches inside each bracketed scale group into one base stitch.
This written version treats the extra slip stitch in layers A and D as a move into the next base stitch, where the following scale begins. In layer C, the extra slip stitch occupies a separate spacer stitch. This keeps the six repeats consistent with each layer’s foundation count.
1. Crochet the Cup Sleeve
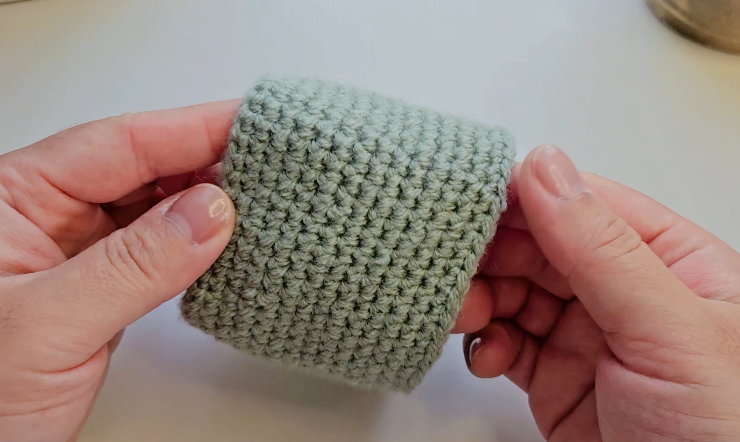
Use sage-green yarn.
Foundation: Ch 44. Check that the chain is not twisted, then sl st into the first chain to form a ring.
R1: Ch 1, sc in each chain around. Join. (44)
R2–4: Ch 1, sc in each stitch around. Join. (44)
R5: Ch 1, repeat [sc in the next 21 sts, inc in the next st] twice. Join. (46)
R6–8: Ch 1, sc in each stitch around. Join. (46)
R9: Ch 1, repeat [sc in the next 22 sts, inc in the next st] twice. Join. (48)
R10–14: Ch 1, sc in each stitch around. Join. (48)
Fasten off and weave in the ends.
The foundation forms the narrower lower edge. The two increase rounds give the upper edge a little more room.
Check the fit after rounds 4, 9, and 14. My sample fits both cup sizes, but “medium” and “large” do not describe identical dimensions across every brand or cup style.
2. Crochet the Dark-Green Leaves
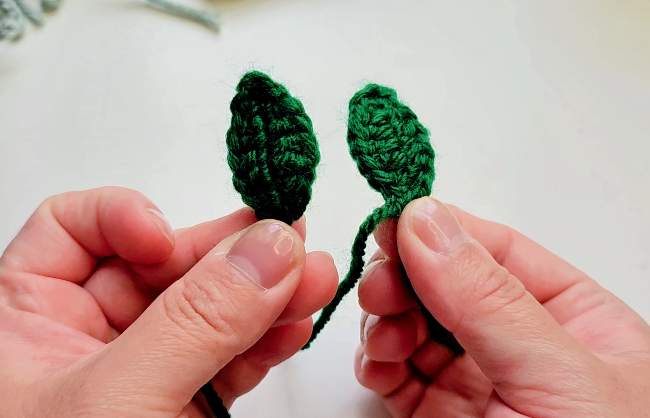
Make two leaves for this arrangement.
Ch 9.
Starting in the second chain from the hook, work:
- Sc in the next chain
- Hdc in the next chain
- Dc in each of the next 3 chains
- Hdc in the next chain
- Sc in the next chain
In the final chain, work [sc, picot, sc].
For this written version, use a three-chain picot: ch 3, then sl st into the first of those 3 chains.
Continue along the unused side of the foundation chain:
- Sc in the next chain
- Hdc in the next chain
- Dc in each of the next 3 chains
- Hdc in the next chain
- Sc in the next chain
Sl st to the first single crochet. Fasten off, leaving a sewing tail.
3. Crochet the Sage Sprigs
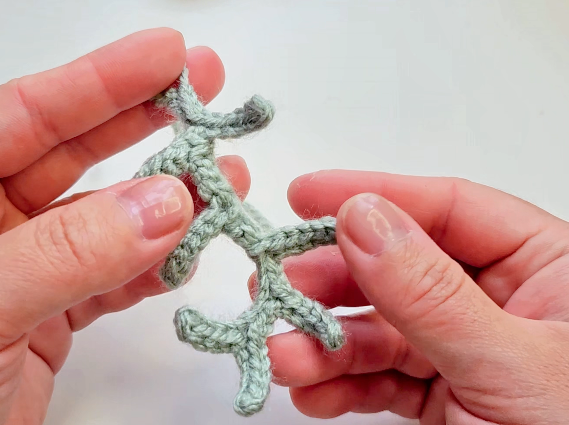
Make two sprigs using sage-green yarn.
Ch 23.
Starting in the second chain from the hook, work 4 sl sts along the foundation chain.
For the first side, repeat the following 6 times:
- Ch 6.
- Starting in the second chain from the hook, work 5 sl sts back along this new chain.
- Return to the main foundation chain and work 3 sl sts along the stem.
Rotate the work to continue along the unused side of the foundation chain.
For the second side, repeat the following 6 times:
- Work 3 sl sts along the main stem.
- Ch 6.
- Starting in the second chain from the hook, work 5 sl sts back along the new side shoot.
Finish with 4 sl sts along the remaining foundation chains.
Fasten off, leaving a sewing tail.
Keep track of the central stem as you work. The little side shoots branch away from it and return to the same point before you continue.
4. Make the Pinecone Cores
Make two cores.
Ch 18. Sl st into the fourth chain from the hook.
Ch 4, then sl st back into that same joining point.
Ch 4 again, then sl st back into the same point once more.
Fasten off, keeping the yarn ends available for assembly.
5. Crochet the Pinecone Layers
Use brown yarn.
For both pinecones together, make:
- Layer A × 2
- Layer B × 2
- Layer C × 2
- Layer D × 3
Join each six-single-crochet foundation round with a slip stitch to the first single crochet. Joining stitches do not count as base stitches.
Keep the center openings large enough to thread onto the cores before securing the ring tails.
Layer A — Make 2
R1: Work 6 sc into a MR. Join. (6)
R2: Repeat the following 6 times:
Work [ch 1, hdc, ch 1, sl st] into the current base stitch. Sl st into the next base stitch.
Begin the next scale in the stitch you just entered.
After the sixth scale, the positioning slip stitch returns to the first base stitch.
Fasten off. (6 scales)
Layer B — Make 2
R1: Work 6 sc into a MR. Join. (6)
R2: Work [ch 2, dc, ch 2, sl st] into each base stitch around.
The double crochet and closing slip stitch of each scale go into the same base stitch.
Fasten off. (6 scales)
Layer C — Make 2
R1: Work 6 sc into a MR. Join. (6)
R2: Ch 1, work 2 sc into each stitch around. Join. (12)
R3: Repeat the following 6 times:
Work [ch 2, 2 dc, ch 2, sl st] into one base stitch, then sl st into the next base stitch.
Begin the next scale in the following unworked stitch.
Each repeat uses two base stitches: one for the scale and one for the spacer slip stitch.
Fasten off. (6 scales)
Layer D — Make 3
R1: Work 6 sc into a MR. Join. (6)
R2: Repeat the following 6 times:
Work [ch 2, 2 dc, ch 2, sl st] into the current base stitch. Sl st into the next base stitch.
Begin the next scale in the stitch you just entered.
After the sixth scale, the positioning slip stitch returns to the first base stitch.
Fasten off. (6 scales)
6. Assemble the Pinecones
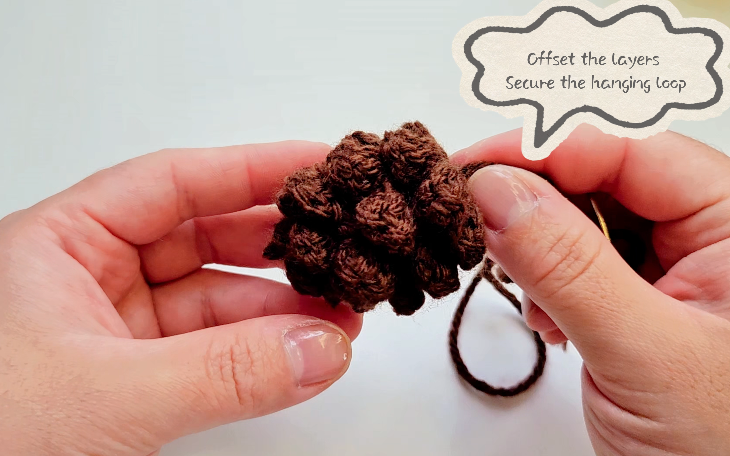
Lay out the pieces before threading them onto the cores.
Large pinecone: A → B → C → C → D
Small pinecone: A → B → D → D
Thread the layers onto each core in the order shown. Turn neighboring layers slightly so their scales overlap naturally.
Secure the starting tail beneath the final D layer to form the hanging loop. Secure the remaining ends and gently arrange the scales.
The different layer combinations create the two pinecone sizes without changing the sleeve itself.
7. Attach the Decorations
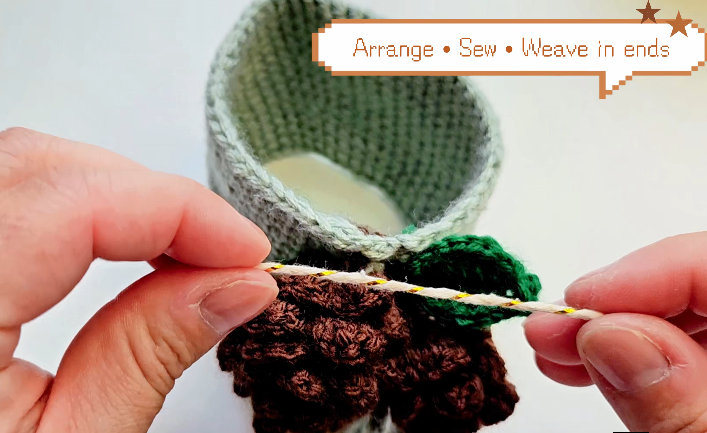
Place the sleeve on an empty cup and arrange the decorations before sewing.
Start with the sage sprigs, positioning their upper ends near the top of the sleeve. Let the lower sections hang naturally.
Place the dark-green leaves behind the pinecones. Arrange the pinecones at slightly different heights so both shapes remain visible.
Once you like the placement, remove the sleeve from the cup and sew the pieces securely in place. Add the cream-and-gold details, then weave in the remaining ends.
Try the completed sleeve on both intended cups and check that the decorations sit where you want them.
Small Details That Help When Making This Cozy
Keep the pinecone layers grouped by letter as you finish them. A few labeled pieces of paper make assembly much easier.
When working the sprigs, mark the next foundation-chain position if you find it difficult to distinguish the stem from the side shoots.
Check the sleeve’s fit before adding the decorations. It is much easier to adjust the sleeve while it is still a plain piece.
For care, follow your yarn’s washing instructions. Reshape the pinecones and trailing sprigs gently after washing.
Make a Woodland Cup Cozy of Your Own
I love the combination of sage green, deep brown, and the tiny cream-and-gold details. The simple sleeve gives the layered pinecones room to stand out, and the dangling sprigs add movement when you turn the cup.
Would you keep this woodland palette, or try a cream sleeve with the same brown pinecones?
Watch the full tutorial:https://youtu.be/wT-tU5ibBDU
Find more crochet projects and share your finished cozy with me on Instagram: https://instagram.com/crochetnotes
Happy crocheting! Crochetnotes
Watch every stitch up close
Pair these written notes with the complete video tutorial.
Made with yarn, shared with love. 🧶💗