
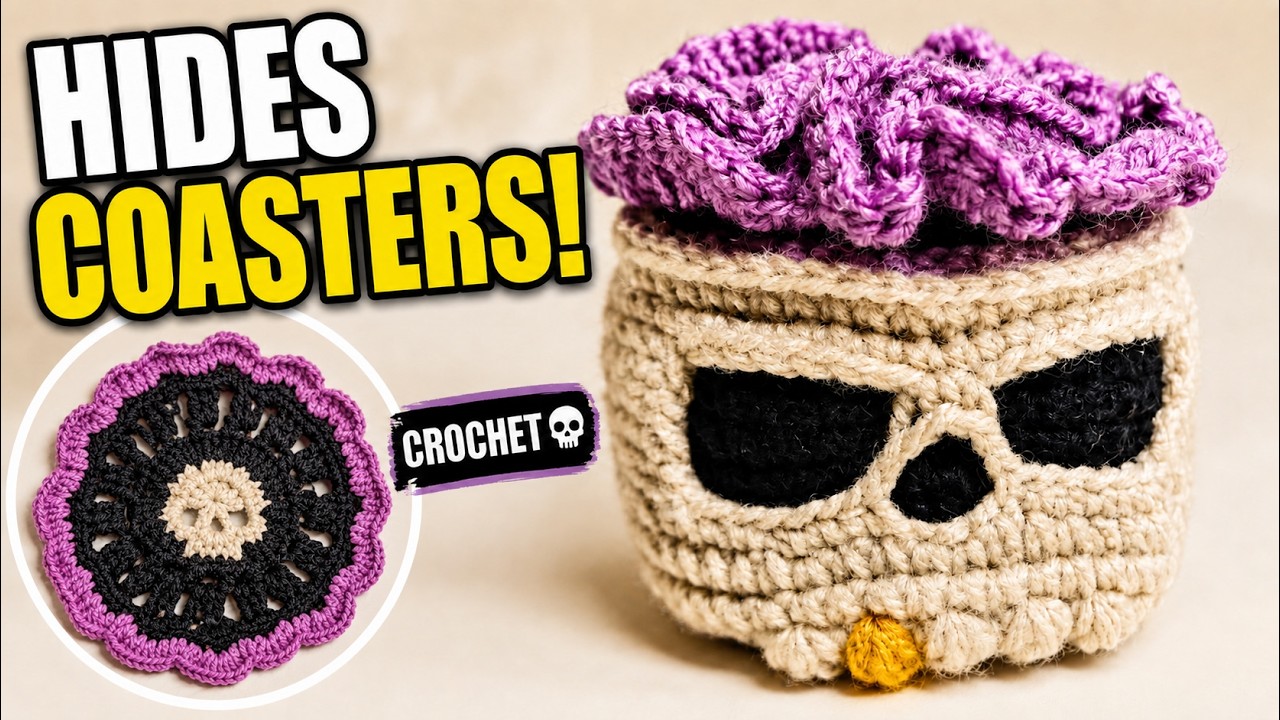
Looking for a Halloween crochet project that is both cute and useful? 🎃 This set includes a skull-shaped holder and matching crochet coasters that tuck neatly inside. The black eye sockets, tiny accent tooth, and colorful ruffles give it plenty of personality.
What you’ll make
- One skull-shaped coaster holder
- Matching open-mesh skull coasters
- Colorful ruffled borders
- A compact set that stores neatly
Materials
- Cream or ivory yarn
- Black yarn
- Small amounts of colored yarn for the coaster borders
- Optional gold or yellow yarn for one tooth
- A crochet hook suitable for your yarn
- Stitch marker, scissors, and yarn needle
💡 Tip: For firmer, more absorbent coasters, try a smooth cotton or cotton-blend yarn. Use yarns of a similar thickness throughout the set.
Abbreviations
- ch — chain
- sl st — slip stitch
- sc — single crochet
- inc — increase
- dec — decrease
- hdc — half double crochet
- dc — double crochet
- BLO — back loop only
- FLO — front loop only
Before you begin
- The main holder is worked in continuous rounds. Mark the first stitch of every round.
- Do not twist the starting chain before joining it into a ring.
- Keep the eye and nose chain spaces slightly loose.
- Count regularly so the skull face stays centered.
Part one: Skull coaster holder
1. Crochet the holder base
- With cream yarn, ch 54.
- Sl st into the first chain to form a ring, making sure the chain is not twisted.
- Work 54 sc around.
- Work two more rounds of 54 sc. You now have three cream rounds.
2. Add the black background
- Change to black yarn and work the next round in BLO: 54 sc.
- Continue with regular sc in a continuous spiral through Round 10.
3. Begin the cream skull face
Return to the unused front loops from the color-change round. Join cream yarn and work 54 sc around those loops.
- Work 38 sc, ch 1, and turn.
- Work 38 sc across.
- Repeat the 38-sc row once more, for three rows of 38 sc in total.
4. Widen the face
- Ch 1 and turn. Increase at the beginning and end of the row: 40 stitches.
- Repeat the increases at both ends of the next row: 42 stitches.
5. Make the eye and nose openings
- Ch 8, skip 7 stitches, and work 2 sc.
- Ch 8 again, skip the next 7 stitches, and continue across as shown in the video.
- Continue around the face in a spiral, maintaining 42 stitches.
- Work 5 sc across the first eye-chain section.
- Ch 2 and skip the center stitches for the nose opening.
- Work 5 sc across the second eye-chain section.

Keep the eye and nose chain spaces relaxed so the skull features stay clearly defined.
6. Join the face to the holder
Align the cream skull face over the black holder. Crochet through both layers: 47 sc, 2 sc across the chain section, then the final 5 sc. Complete one more full round of 54 sc.
7. Crochet the teeth
Work 43 sc to reach the mouth. Repeat a group of 3 dc followed by 1 sc five times, then finish with one last 3-dc group. Change one tooth to gold if you would like a playful accent.
8. Shape the bottom
Decrease evenly through the successive rounds shown from 09:21 in the video. Keep the skull centered and the base flat, then close the remaining opening and weave in the tail.
Visual checkpoint: The exact decrease placement is displayed on screen in the tutorial. Check each round before continuing so the holder closes symmetrically.
9. Reinforce the top edge
Return to the unused front loops near the opening and work one round of slip stitches. For a firmer holder, add the optional round of sc shown in the video before the final edge.
Part two: Skull coaster
1. Crochet the skull center
With cream yarn, begin with a magic ring. The first two small rounds create the skull center, eye openings, and nose space. Keep the chain spaces loose and follow the on-screen chart beginning at 13:28.
For the final cream round:
- Increase in each of the first 6 hdc.
- Work 6 sc across the first ch-5 section.
- In the center ch-3 space work: sl st, ch 2, 4 hdc, ch 2, sl st.
- Work 6 sc across the second ch-5 section. Join and fasten off.

The cream skull center is surrounded with black yarn before the open mesh rounds are added.
2. Add the black coaster section
Join black yarn around the cream skull. Work BLO where indicated and use dc increases around the upper curves. Keep the eye and nose openings visible.
3. Crochet the open mesh
Work the two chain-space rounds shown from 15:07 in the video. Keep the loops even and relaxed; they form the light mesh and prepare the coaster for its border.
4. Prepare the border
Work 3 sc into each chain space and 3 sc across each solid section. Repeat around and finish with 84 stitches.
5. Crochet the ruffle
- Working in BLO, ch 3.
- Work 2 dc in every stitch around.
- Join, fasten off, and weave in the yarn ends.
Doubling the stitch count creates the full ruffled edge.
Make the colors your own ✨
Try orange, purple, lime green, black, or deep red for a classic Halloween set. For a softer everyday version, use dusty pink, sage, beige, or muted blue. You can make every border different to use up small yarn scraps, or repeat one color for a coordinated look.
💡 Tip: Keep all the teeth cream for a clean look, or give the skull one gold tooth for a small detail that makes the project feel extra playful.
Finishing
Gently shape each coaster so the skull center lies flat. Lightly block the pieces if needed, following the care instructions for your yarn. Stack the finished coasters inside the holder—the colorful ruffles disappear inside and the skull becomes a fun piece of décor.
▶️ See the finished set at 18:57
Final thoughts
I love crochet projects that are decorative but still practical, and this little skull set is both. Make it as Halloween décor, a handmade gift, or a colorful addition to your own table.
Which colors would you choose—spooky orange and purple, soft pastels, or a simple black-and-cream combination?
▶️ Watch every stitch in the full Crochet Notes tutorial
Pattern note: The video credits pattern inspiration/reference to Xiaohongshu creator ID ranshuiguo004.
Watch every stitch up close
Pair these written notes with the complete video tutorial.
Made with yarn, shared with love. 🧶💗